
Storage Space Decluttering Calculator
Estimate how much space you can reclaim by applying the One-Year Rule and digitization strategies. Enter your current storage metrics below to see potential improvements.
Your Decluttering Results
- Space from Purging Unused Items: 0 cubic feet
- Space from Digitizing Papers: 0 cubic feet
- Total Estimated Space Reclaimed: 0 cubic feet
- New Available Storage Capacity: 0%
- Tip: Use this reclaimed space for vertical shelving or multipurpose furniture as suggested in Step 2 and Step 3.
Have you ever walked into a room and felt instantly overwhelmed by the sheer volume of stuff? You’re not alone. Most of us accumulate more than we need, leading to cluttered homes and stressed minds. The good news is that freeing up storage space doesn’t require a complete overhaul or expensive renovations. It starts with a few simple strategies that anyone can implement.
In this guide, we’ll walk through practical steps to clear out unnecessary items, organize what remains, and maximize every square inch of your home. Whether you live in a tiny apartment or a spacious house, these methods will help you reclaim your space and create a more peaceful living environment.
Key Takeaways
- The One-Year Rule: If you haven’t used an item in the past year, it’s likely time to let it go.
- Vertical Space Matters: Utilize walls and high shelves to double your available storage without losing floor space.
- Digital Decluttering Counts: Clearing digital files reduces mental clutter and frees up device storage.
- Multipurpose Furniture Wins: Invest in pieces like ottomans with hidden compartments or beds with drawers underneath.
- Consistency Is Key: Regular small clean-ups prevent future pile-ups better than occasional massive efforts.
Step 1: Conduct a Ruthless Purge
The first step to freeing up storage is removing things you don’t need. This isn’t just about tidying-it’s about editing your life. Start with one small area, like a single drawer or shelf. Pull everything out and ask yourself three questions: Do I use this? Do I love this? Does this serve a purpose?
If the answer to any of those is no, consider letting it go. Don’t worry about “what if” scenarios. Chances are, if you truly need something again, you can find a replacement easily. For example, that old blender from five years ago? Unless it’s a rare collectible, there’s probably a newer model waiting for you at the store-or even better, you might discover you don’t miss it at all.
Categorize items into four piles: Keep, Donate/Sell, Recycle, and Trash. Be honest with yourself. Holding onto broken appliances or clothes that no longer fit only adds stress. Once you’ve sorted them, immediately remove the non-keep items from your home. Out of sight, out of mind-and out of your storage equation.
Step 2: Maximize Vertical Space
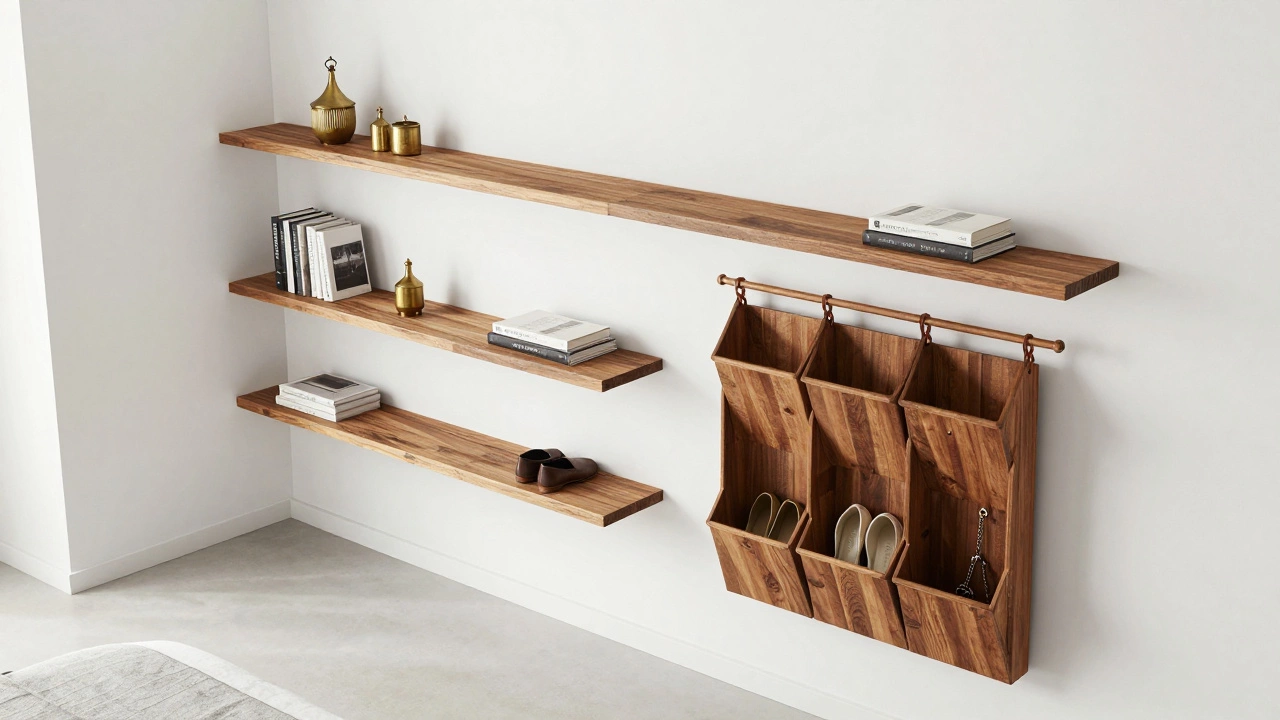
Most people focus on horizontal surfaces-tables, countertops, floors-but forget about vertical space. Walls are underutilized real estate. Install floating shelves above doorways, behind toilets, or along hallways. These spots are perfect for books, decorative objects, or rarely used kitchen gadgets.
Hanging organizers are another game-changer. Over-the-door racks work wonders in bathrooms, closets, and pantries. They keep shoes, toiletries, or spices neatly arranged and accessible. In bedrooms, consider adding hooks near the entryway for coats, bags, and hats. Every inch counts when you’re trying to free up storage.
Don’t overlook ceiling height either. Loft-style shelving units can reach toward the top of your walls, storing seasonal decor or luggage safely out of the way. Just make sure they’re securely anchored to avoid accidents.
Step 3: Embrace Multipurpose Furniture
Furniture that serves dual purposes is a lifesaver for tight spaces. Think beyond traditional designs. An ottoman with a hollow interior doubles as seating and storage. A bed frame with built-in drawers eliminates the need for separate dressers. Even coffee tables with lift-top mechanisms provide extra workspace while hiding magazines or remotes underneath.
When shopping for new pieces, prioritize functionality over aesthetics alone. Look for labels like “storage-friendly,” “convertible,” or “compact.” Brands often highlight these features because consumers increasingly value smart design. For instance, IKEA’s MALM series includes options with integrated drawers, making it ideal for smaller apartments.
Repurposing existing furniture also works wonders. Turn an old ladder into a towel rack or bookshelf. Attach baskets to the rungs for added utility. Creativity here saves money and reduces waste-a win-win situation.
Step 4: Digitize Where Possible
Paper clutter takes up significant physical space. Tax documents, school records, photos-all contribute to overflowing cabinets. Scanning important papers and storing them digitally frees up drawers and filing cabinets. Use cloud services like Google Drive or Dropbox for secure backups.
Photos deserve special attention. Instead of keeping boxes of printed pictures, digitize them using apps like ScanSnap or Adobe Photoshop Elements. Label folders clearly so finding memories becomes effortless. Delete duplicates and blurry shots during the process. Not only does this reduce physical bulk, but it also protects against damage from moisture or pests.
Emails and digital downloads follow similar principles. Unsubscribe from newsletters you never open. Archive old messages instead of deleting them outright. Empty trash bins regularly. Digital hygiene mirrors physical cleanliness-it keeps both worlds tidy.
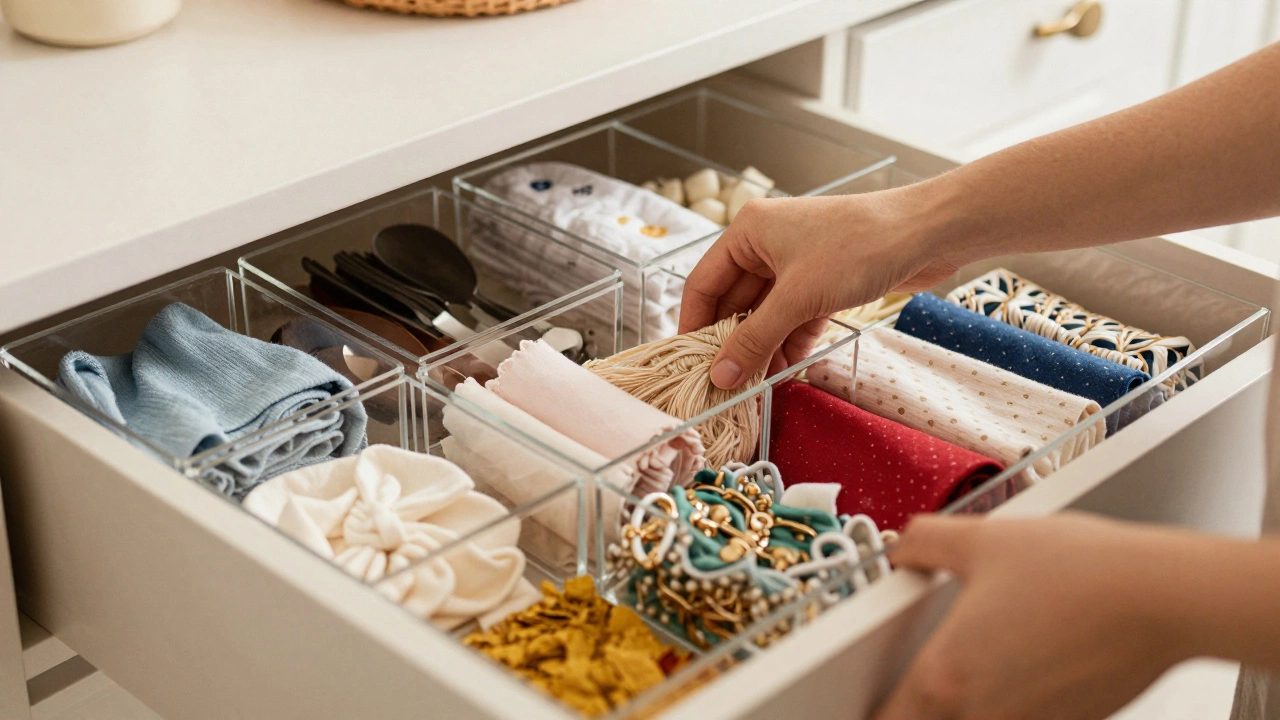
Step 5: Create Zones for Everything
A place for everything means less chaos overall. Assign specific zones within each room based on activity. In kitchens, group baking supplies together, cooking utensils nearby, and cleaning tools elsewhere. Bathrooms benefit from designated areas for skincare, haircare, and first aid kits.
Use containers to define boundaries further. Clear bins allow visibility, helping locate items quickly. Uniform sizes stack neatly, optimizing shelf efficiency. Label lids or sides for quick identification. Children especially appreciate labeled sections-they learn responsibility early when tasks feel manageable.
Entryways pose unique challenges since multiple activities converge there (shoes off, keys down, mail sorted). Install a console table with cubbies below for shoes and baskets above for gloves or scarves. Add a hook board for leashes or umbrellas. Small investments yield big returns in daily convenience.
Comparison Table: Traditional vs Smart Storage Solutions
| Feature | Traditional Approach | Smart Solution |
|---|---|---|
| Space Utilization | Focused on horizontal surfaces | Leverages vertical and hidden spaces |
| Furniture Functionality | Single-purpose items dominate | Multipurpose designs prevail |
| Organization Method | Random placement leads to confusion | Zoned systems enhance accessibility |
| Digital Integration | Minimal reliance on technology | Cloud storage replaces paper archives |
| Maintenance Effort | Infrequent deep cleans required | Daily habits sustain order effortlessly |
Pro Tips for Long-Term Success
Sustaining freed-up storage requires discipline. Here are some pro tips to maintain progress:
- Set Weekly Goals: Dedicate ten minutes weekly to tackle one small zone. Consistency beats intensity.
- Involve Household Members: Make decluttering a team effort. Kids enjoy sorting toys; partners share responsibilities equally.
- Rotate Seasonal Items: Store winter gear during summer months and vice versa. Vacuum-sealed bags compress bulky belongings efficiently.
- Buy Less, Choose Well: Before purchasing anything new, evaluate whether it fits current needs. Quality trumps quantity always.
- Track Progress Visually: Take before-and-after photos of rooms. Seeing transformations motivates continued improvement.
Mini-FAQ
How do I decide what to throw away versus donate?
Items in poor condition belong in the trash. Clothes with stains, electronics missing parts, or furniture damaged beyond repair should be discarded responsibly. Functional goods suitable for donation include gently worn clothing, intact books, working appliances, and usable household items. Local charities appreciate quality contributions.
What’s the best way to organize a small closet?
Start by hanging frequently worn clothes at eye level. Fold sweaters and jeans neatly on lower shelves. Utilize hanging shoe organizers for accessories. Install tension rods inside drawers to separate socks or underwear. Consider slim hangers to save width. Finally, add under-shelf baskets for extras.
Can renting affect my ability to install permanent storage solutions?
Renters face limitations regarding drilling holes or painting walls. However, many alternatives exist. Command strips support lightweight shelves without damaging paint. Freestanding units move easily between locations. Portable racks adapt to various settings. Always check lease agreements beforehand to avoid penalties.
Is it worth investing in custom cabinetry?
Custom cabinetry offers tailored fit and maximum efficiency but comes at higher costs. Evaluate budget constraints carefully. Off-the-shelf modular systems often achieve comparable results affordably. DIY projects involving pre-cut panels provide middle-ground options balancing cost and customization levels.
How often should I reassess my storage setup?
Reassessments occur naturally with changing seasons or life stages. Aim for biannual reviews aligned with spring cleaning traditions. Adjust layouts according to evolving routines. Children grow faster than expected; teenagers demand different arrangements. Flexibility ensures long-term satisfaction.